Importance of HTTPS #
In the modern web, almost every website uses HTTPS, which relies on SSL/TLS certificates to secure data in transit.
Why HTTPS Matters #
Encryption: Protects sensitive data from being read in plain text by third parties or attackers on the local network (mitigates man-in-the-middle attacks).
Authentication: Ensures visitors are connecting to the genuine website rather than a fraudulent spoofed site.
Data Integrity: Prevents network nodes from altering or injecting malicious code into transit payload data.
Historical Context & Milestones #
The widespread adoption of HTTPS followed a major transition over the past few decades:
- The Early Days: HTTP as Default protocol of the internet while minority usage, that cause the Plaintext Transmissions and All data was sent unencrypted, making messages easily interceptable by attackers.
- Barriers to Early Adoption: The SSL certificates at first is were expensive and lacked free alternatives. Althrought SSL certificates still have it merket place till nowadays, many website can not affolid the SSL certificates, and hardware can not support well SSL/TLS cryptographic handshakes and encryption computationally heavy, leading to performance bottlenecks.
- The Turning Point: Let’s Encrypt & Ecosystem Push: While Let’s encrypt provided free, automated SSL/TLS certificates, lowest the operation cost of website provider. mainwhile, Major internet stakeholders (search engines, browser vendors) began actively encouraging HTTPS by flagging non-HTTPS sites as “Not Secure” and boosting HTTPS sites in search rankings. Therefore, the https protocol have upper trend
How SSL/TLS Works: Chain of Trust #
SSL/TLS authentication relies on Public Key Infrastructure (PKI) to verify a website’s identity:
-
Certificate Issue & Presentation: A Certificate Authority (CA) verifies the domain owner and issues an SSL certificate. The website presents this certificate to visitors during the initial handshake.
-
Asymmetric Cryptography: The website proves ownership using its private key, while the client uses the matching public key embedded in the certificate to verify identity.
Chain of Trust:
-
Trust flows downwards: A Root CA trusts an Intermediate CA, which in turn issues certificates to end-user websites.
-
Clients (like web browsers and operating systems) only need to maintain a pre-installed list of trusted mainstream Root CAs to verify any certificate in the hierarchy.
Therefore, the transfer across the internet is general encrypt will less affact and noticed. The end user does not need understand the knowledge and free to browse internet.
How to Apply for SSL/TLS Certificates Manually #
While there are many resources explaining how to automatically issue and renew certificates using Certbot in Docker or Kubernetes, setting up automated renewal pipelines can be overhead for personal or small-group projects. For simple use cases, issuing certificates manually is often cleaner and sufficient.
How to Get a Domain Name (Free vs. Low-Cost) #
Before applying for a certificate, you need a domain name. You can either purchase a low-cost domain or use a free Dynamic DNS (DDNS) provider.
Option 1: Purchasing Low-Cost Domains #
Top-Level Domains (TLDs) like .top or .xyz (especially with randomly generated characters) are extremely cheap—often costing just 1 to 2 per year. Purchasing a cheap TLD offers better stability and ownership compared to completely free options.
Option 2: Free Domain Providers (Not Recommended) #
Services like Freenom previously offered free domains (e.g., .tk, .ml). However, relying on them carries major risks:
-
Arbitrary Revocation: Free domains can be taken back or canceled without notice. Example: My leatruer methion that in past class presentation, a group lost access to their Freenom domain right before their demo. Because their domain was hardcoded into their configuration files, they could not fix it in time.
-
ISP & Browser Blocks: Because free TLDs are frequently abused for spam and phishing, many Internet Service Providers (ISPs), ad blockers, and security providers block entire free TLD extensions.
Option 3: Free Dynamic DNS (Recommended for Personal Projects) #
If you do not want to buy a domain, use a Dynamic DNS (DDNS) service like DuckDNS, No-IP, or DigitalPlat FreeDomain.
Why DDNS is better:
-
Dynamic IP Syncing: DDNS services map a fixed domain name to a changing home/public IP address by continuously updating DNS records when your IP changes.
-
Better Stability & Lower Overhead: Managing DDNS infrastructure requires very few resources compared to full domain registries, making these services far more stable and less prone to sudden policy changes or service shutdowns.
As the DDNS resource is accessoble, many routers come with built-in DDNS client support:
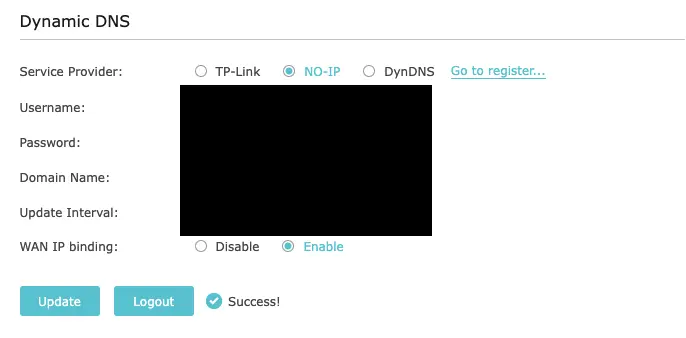
The client update program is still easily set-up. If your router does not support it, setting up the client update program on Linux is straightforward:
no-ip: How to Install the Linux Dynamic Update Client
Ensure No-ip DNS record using your ISP address, you can find on what my ip address
Note: The free tier of No-IP requires active confirmation every 30 days, which takes about 1–2 minutes.
Domain Control Validation (DCV) #
Each Certification Authority has different requirements for their signing. Before issuing an SSL/TLS certificate, a Certificate Authority (CA) requires Domain Control Validation (DCV) to verify that you control the domain. CAs typically offer three validation methods:
Email-based DCV (Traditional): The CA sends an email containing a unique validation code and link to an administrative contact address registered to the domain (e.g., admin@yourdomain.com). Clicking the link and entering the code verifies domain ownership.
DNS CNAME-based DCV: The CA hashes your Certificate Signing Request (CSR) and provides specific hash values. You create a custom CNAME record in your DNS settings using these values to prove control.
HTTP(S)-based DCV: The CA hashes your CSR and provides a specific token. You create a plain-text file containing this token and host it in a designated public directory on your web server (typically /.well-known/pki-validation/).
Once the CA successfully verifies domain control, it issues the certificate files (typically packaged in a .zip archive).
Using web_go to Serve HTTP(S)-based DCV #
I wroten a small Go-based utility that can more effiently to handle HTTP challenge verification efficiently:
Prerequisites: Install Go on your machine by following the official Go installation guide.
Method 1: Apply Certificates via Web UI (ZeroSSL) #
- Navigate to the ZeroSSL webpage and create an account.
- Select New Certificate.
- Enter your domain (e.g., xxx.ddns.net), choose 90-Day Certificate, and disable ZeroSSL protection (keep other settings as default).
- Select File Upload (HTTP) as the verification method. (Email and CNAME DNS verification are unavailable on free DDNS plans.)
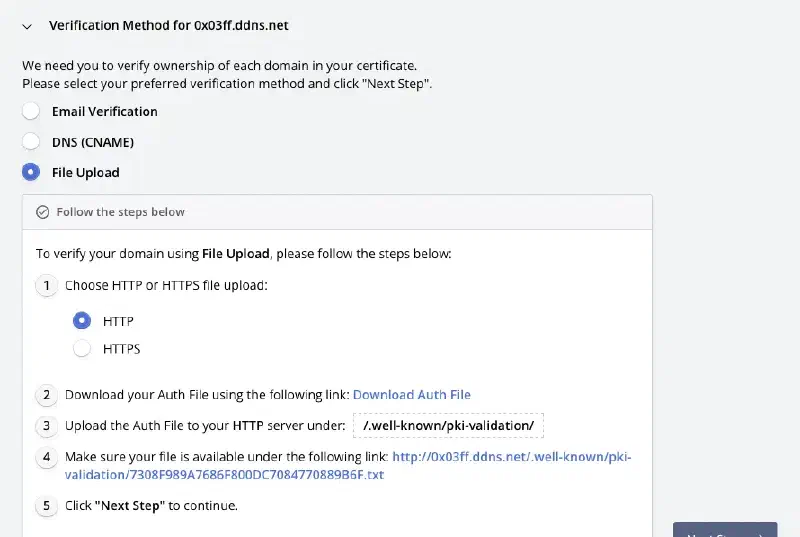
Local Setup Steps: #
-
Download the Auth File provided by ZeroSSL and copy text content then paste into challenge.txt.
cmd ├── challenge.txt ├── main.go └── process.md 1 directory, 3 files -
Modify the TEXT_NAME in cmd/main.go, Start the server to verify:
./scripts/run.sh - The web server will start on 127.0.0.1:8080. Verify that the authentication file is accessible via curl or your browser:

- Press Ctrl + C to stop the server once confirmed.
Deploying to Remote Servers or Cloud VMs #
If performing verification on a remote instance:
- Compile the binary for your target platform: ./scripts/compile.sh
./scripts/compile.sh 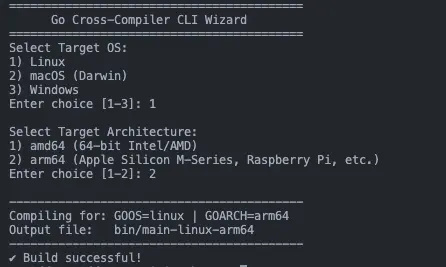
-
Modify the address in cmd/main.go if need, default is or 0.0.0.0:8080(require transfer 80 request into port 8080), like 0.0.0.0:80(require sudo).
-
Transfer the compiled binary to your remote server via SCP:
scp example.txt user@remote_host:/home/user/
scp ./bin/main-linux-arm64 username:ip-address:~
- SSH into the target host, run the executable, click Verify Domain in the ZeroSSL dashboard, and download your generated certificates.
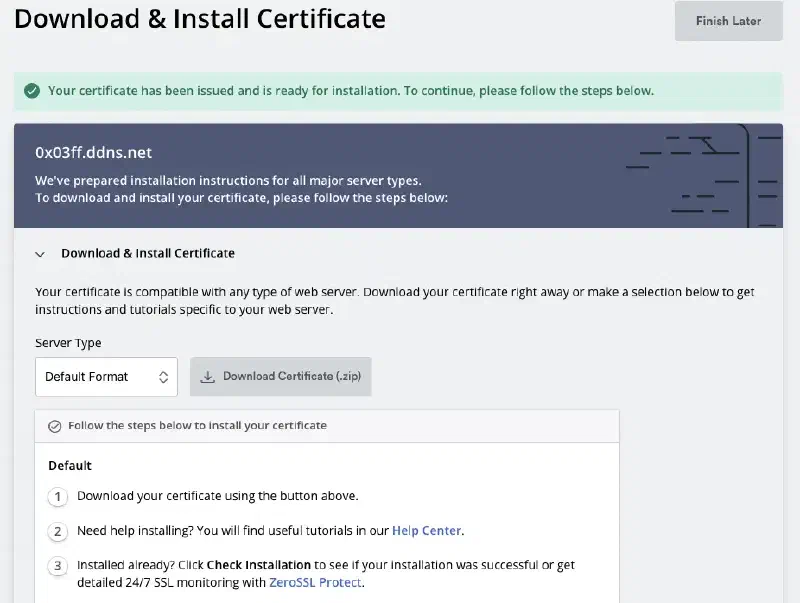
ZeroSSL’s web dashboard under free plan enforces a strict total limit of 3 lifetime 90-day certificates, renewals count as new certificate issuances and expired certificates do not restore the quota, a single account maxes out after 3 issuances on same domain name(270 days total). Or using certbot at below for unlimited quotas 90-day certificates.
Method 2: Apply Certificates via Certbot #
Step 1: Install Certbot #
# Install Certbot via apt
sudo apt update
sudo apt install certbot
# Install Certbot via Snap
sudo snap install --classic certbot
# Create a symlink so the certbot command works
sudo ln -s /snap/bin/certbot /usr/bin/certbotStep 2: Request the Certificate #
Run Certbot in manual mode using the HTTP challenge:
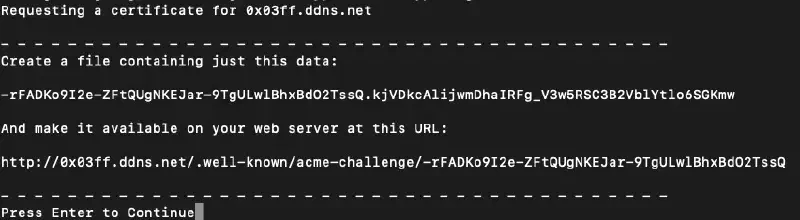
sudo certbot certonly --manual --preferred-challenges http -d example.comCertbot will output the required validation file name and string content:
Step 3: Serve the Challenge File #
-
Open a new terminal session.
-
Update your web_go configuration/file structure with the token and string returned by Certbot. Then run the script/run.sh to test
-
type Ctrl+C to stop the local server
-
Compile the binary for your target platform: ./scripts/compile.sh
./scripts/compile.sh -
Transfer the compiled binary to your remote server via SCP and execute:
scp example.txt user@remote_host:/home/user/
scp ./bin/main-linux-arm64 username:ip-address:~
-
Verify accessibility in your browser or terminal using curl:

-
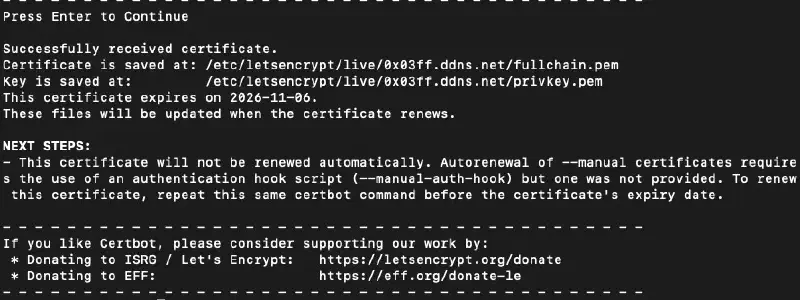
Return to the original terminal running Certbot and press Enter. Once verified, Certbot will issue the certificates to /etc/letsencrypt/live/.